by Ken Warren
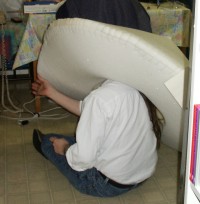
Working inside the hood
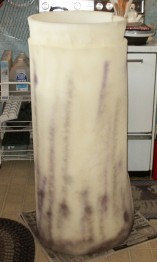
Painting the mushroom stem

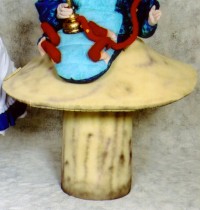
The hookah
We knew what the mushroom had to be very early on: a foam-rubber skirt I would wear around my waist that held up the bottom half of the caterpillar. The stem would conceal my legs. All that remained were the details. Of course, the details are where all the fun is in costuming, but at least this piece, unlike other elements in the ensemble, really didn't give us trouble.
Step one was to get foam rubber. And conveniently, we have a store nearby called Building #19 which sells, among other things, lots of foam rubber, in lots of sizes. We got ourselves three one-inch-thick queen-sized sheets, normally used as mattress pads - one for the stem, and two for the hood.
We started by constructing the hood. Since I didn't exactly know what I was doing, I figured this would be a practice run, and we'd have to go back to the store for more foam rubber to do it for real. I first cut a disk as large as possible out of one sheet, to be the top dome of the mushroom. I then cut a smaller disk out of the other sheet, totally guessing how much smaller I wanted it to be. Then I crudely measured my own diameter, added a few inches, and cut an oval out of the smaller disk for the as yet unmade stem to stick through.
At this point, we hadn't decided how we were going to handle the mushroom on stage. We considered suspenders to hold it up and skirt hoops to hold it out, whether to attach the hood to the stem permanently, and bending the stem to allow easier walking. But what we did know was that we wanted a curved dome for the top of the hood, and a flat underside.
So I cut a line from the center of the top disk to one edge, and overlapped the edges to make a cone-like shape. And since I wanted to see how this was going to work, I grabbed a whole lot of thread and basted the outer edge of the top disk to the bottom, spacing each stitch about an inch apart. Our intent was for the bottom disk to lay flat, and the top disk to attach at right angles to it (see the poorly-drawn diagram at right), so that's how I basted it. And you know, it looked good.
So we decided that I'd done well enough on my first try to make this the real thing. The mottled edge of the mushroom looked intentional, and natural, and the thread, in black, blue, red and green (as each spool end ran out), was pretty much invisible. I tightened the threads a bit to try and pull the edges closer together, but foam rubber being foam rubber, they pulled apart. And the thread dug into the foam. So I crawled inside and hot-glued the edges together.
Now, let me tell you about hot glue and foam rubber. The high-temperature hot glue melts foam rubber. Dissolves it, practically. But you know, if you put enough on, you can make a good, solid seam. And believe me, I slathered the hot-glue into that corner. And whaddaya know, it held.
So we had a good hood, much to our surprise. It wasn't a perfect dome, but foam rubber wasn't made to do domes, and it looked good anyway. And because of the oval I had cut in the bottom, we know how wide our stem had to be. So we did a little measuring, decided how tall it was going to be, made it a little wider at the bottom, and cut ourselves out a stem.
One important thing I'd learned working with the hood was that thread and foam rubber don't really get along. So to sew up the back of the stem (since I wasn't going to be hot-gluing that), I grabbed some of Donna's white yarn. I stitched it starting about 5 inches from the top to about 8 inches from the bottom. The space at the top was for attaching the caterpillar jacket, and the space at the bottom was in case I needed the extra room to walk (not unlike a slit at the bottom of a tight skirt). And suddenly we had a mushroom.
Next we put it together and started to figure out exactly how we were going to put it all together. We cut several slits at the point of the cone of the hood to allow the top of the stem to pass through, with the remaining flaps folding under. We would rely entirely on the friction of foam rubber against itself to hold the hood onto the stem, and we would rely entirely on the stem, with a little stabilization from my legs, to hold it all up. No suspenders or hoops. And because of transportation issues, we decided not to attach the sections, either. We would slide the hood over the stem in the green room.
We also thinned the top 5 inches of the stem to attach the jacket to. It just looked better that way. So the top of the hood, with the flaps folded down, just came to the beginning of the thinned area. And the jacket, with strategically placed velcro on the stem and the jacket, would come down to the same line.
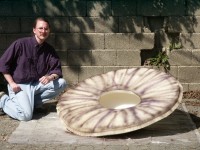
Next, we had to paint it. We got ourselves beige, brown, red and purple paint, and took the pieces out back. First, we coated it in beige to darken it slightly. The foam rubber was already pretty close to what we wanted in color, but the beige paint made it all more consistent. Then we made some spots and swirlies on the top of the hood, and dark, radial lines on the bottom. And finally we made long, sweeping, vertical lines at the base of the stem. With a little brown and purple wash to complement it, we had a colored mushroom.
And then we had to make a piece for Alice to break off. We have lots of foam rubber around the house, so we grabbed a 1/2"-thick section and cut out a little blob for her to take and bite. We attached it to the right side of the top of the hood using velcro so it'd be invisible on stage until she grabbed it and pulled it off. It, too, was painted to match the rest of the mushroom.
Finally, the hookah. Try as we might, we absolutely couldn't find a commercial hookah that was in our price range, let alone one that looked Aladdin-esque. So after a few weeks looking while we wrapped up other elements, we finally had to make one ourselves. Thankfully, it didn't have to work.
It was basically an upside-down bowl with a wooden candlestick glued to the top. We spray-painted the whole thing gold, put black craft-foam on the bottom to cover the bowl's top, and attached some wired chenille to make a tube that had some rigidity. To add a little more ostentatiousness to it, we hung some gold coins on the tube. As a mouth-piece we attached one of those "whizzer" spinner whistles - not useful on stage, but fun in the Green Room. And finally, we hot-glued rhine-stones to the surface of the hookah, making a multi-colored cross-hatch on the base, and a flowered vine motif on the stem.
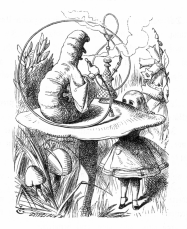
Illustration from the Lewis Carroll book
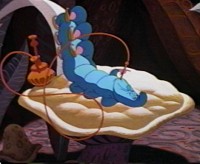
Cel from the Disney movie
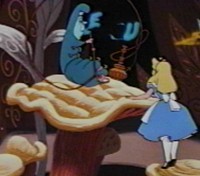
Cel from the Disney movie
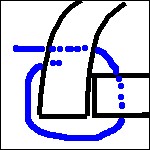
Attaching the hood sections