© 2001 Gunther Anderson
© 2001 Gunther Anderson
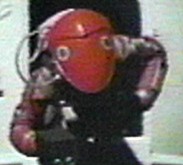
The real movie helmet, from
http://www.2001exhibit.org/
© 2001 D. M. Dubé
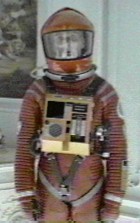
Bowman exiting the pod
on his way to the AE-35
by Gordon Callahan
Bowman beyond the infinite

by Gordon Callahan
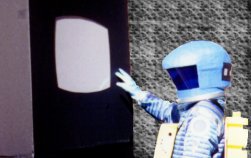
Bowman checking out the hotel
at the end of the universe
I guess eggs have gone out of style since the late 60s. There was a time when the natural egg shape was ubiquitous in new-age, modern furniture, packaging, architecture, you name it. But then, this was the era of broad-striped tights, frilly shirts, mutton-chop side burns, and folk rock. Much has changed. Unfortunate for people trying to recreate one of those by-gone elements.
Originally, I envisioned simply finding a round bowl and an oval bowl, cutting them in half, and gluing them together. But I never did find bowls that were really suitable, let alone deal with the issues of merging them. I searched for egg-shaped objects, balloons, piñatas, dishes, trash cans, anything, and came up largely blank. The best I did was an inflatable Easter egg, measuring 10" across the minor diameter, and one of those expanding crepe eggs, even smaller. Interestingly, toilet bowls looked to be just the perfect size and shape to be a negative cast of the helmet, but I didn't have any I could slice up. Oh, and I also found an 8"-across hollow, plastic Easter egg.
Which brings me to the other problem: I can't measure. Or in this case, I didn't measure carefully. With my understanding of the correct neck width (10 inches), I dutifully checked the helmet pictures and decided it was supposed to be 12 inches across. In reality, it was also 10 inches, and tapered slightly, so my inflatable egg was perfect. I bought that egg in March, and I didn't realize this until two days before Balticon, at the end of May.
Anyway, the helmet was an interesting odyssey. After I found the inflatable egg, I discovered plaster tape. This is the sort of stuff they used to make casts for broken bones out of - 4"-wide strips of fabric impregnated with plaster. Wet them, and they become floppy. Place them and let them dry, and they become fairly rigid. So I took the inflatable egg and made a plaster tape mold of the top half. It actually looked good.
Then I discovered expanding foam insulation. I was actually looking for expanding foam packing material, which I have seen put to good use, but I found "Great Stuff" (I believe it was called) instead. I cut the 8" plastic egg in half, set it inside the outer shell, and squirted the expanding foam material into it in hopes of making a much more resilient, rigid shell. The original concept of the presentation involved me throwing the helmet away after I became a monkey, so I wanted a helmet that could handle that.
Unfortunately, I couldn't keep the plastic inner shell pressed tightly enough against the expanding foam, so the helmet casing came out too tall. I also didn't have the gorilla head yet, and in retrospect the 8" shell was too small anyway. And, to my downfall, I decided that the plaster tape shell I originally made was just too small. I needed to figure out a way to either make a new mold 2" wider, or expand the one I had then. No options presented themselves readily.
At a fabric store I stumbled across more embroidery hoops, so I bought a 12" round set and a 12"x18" oval one, in hopes that I could fuse them to make at least an oval cross-section form. But ya know, it just never looked right. It just seemed too big. I should believe my instincts more often.
In the ensuing weeks I would try carving large blocks of foam rubber (I definitely do not have the skill), wrapping the existing helmet mold in 1/2" foam rubber to expand it, and even taping paper plates together to make an approximate egg-form, with the intent of coating it with buckram and smoothing out the irregularities. And that's not as silly as it sounds.
Paper plates are small, flexible, and already a little rounded. Using the embroidery hoops as a base, it turned out to be the best 12" half-egg I'd yet made. I took it to a mirror and looked closely at it. It was too big, and yet it was exactly the right size. So a trip back to the printouts of the screen captures led me to the unmistakable conclusion that the very first mold I had was right. I sighed.
Along the way, Donna had introduced me to buckram, which is a lot like plaster tape except that it comes in bolt-width sheets, and uses glue rather than plaster. I took the old, now-too-tall helmet, coated it with cellophane, and made a fresh mold from it. Taking large sheets of buckram, I wetted them and laid them on top of the old helmet. I reinforced it a little with a long strip aroud the side, and set it to dry. It looked good, and I finally had, two days before convention, a working helmet top.
I cut out some cardboard and wrapped it around the back to make the back and sides of the helmet. I had also already bought the blue plastic face shield, which was just a thick sheet of, I think, mylar. It's actually another quilting template (see the chest pack for the first one), but it's blue and doesn't have the grid lines. And on stage, we figured it'd be effectively opaque, so the audience wouldn't see the gorilla head until it was time.
Anyway, I figured out how far the sides had to come forward, because the face plate would only go so far back. Then I took more cardboard and made a 10"-diameter, 2"-tall neck ring. Where the ring didn't meet the helmet (which was most of the place), I figured I could compensate by just using duct tape on the back, and slanting the visor in the front. I duct-taped the cardboard pieces together, and attached the bottom half to the buckram mold on top.
I had only done two layers of buckram on the top piece, though, and it was still a little wobbly. So I decided that I could reinforce it with a little plaster tape (we've got a lot of it kicking around, now). This may seem like a good idea until you remember that plaster tape softens with water. So does buckram. About half way through, I realized that the wet plaster tape was softening the buckram, threatening to collapse the whole helmet. So we got some things (like a full-sized glass head) to prop up the inside, and I started blow-drying the thing like crazy, hoping to harden it up enough to stand on its own. I succeeded, but it was scary for a while.
This made for the only change in the presentation - I no longer felt the helmet could stand being thrown across the stage, so I just held onto it after taking it off, and carried it offstage with me. After the plaster tape, and in fact before everything was completely dry, I decided duct tape hadn't failed me yet, so I would complete the reinforcement top to bottom in duct tape. And that I did. That left us with the one remaining major task of coating it in blue.
Months before, I had picked up a half a yard of baby-blue vinyl (shower-curtain sorts of stuff), intending to lay it on the helmet. This proved a lot harder than I'd thought, since vinyl is flat and the helmet isn't. I was faced with ripples and folds, and I even tried to soften it with the hair dryer so I could pull it over. Nothing worked. In the end, I thought once more, "Duct tape hasn't failed me yet." So off to Home Depot we ran, and got spools of what we thought was blue duct tape. It turns out it was masking tape, and while it wasn't perfect (duct tape is fabric, and stretches slightly; masking tape is paper, and doesn't), it worked. The helmet was blue.
I took a half-inch strip 33 inches long of the blue vinyl I didn't use and glued it to the inside of the round helmet bottom, and then glued that vinyl to the inside of the 10" silver embroidery hoop that would attach to the neck piece. It gave a little flexibility to attaching the neck piece, and made up for the fact that I made the helmet the same size as the ring, not slightly smaller as I should have.
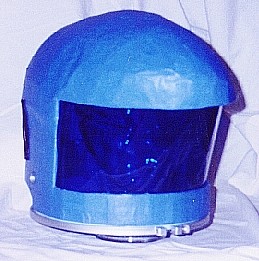
I then cut the visor to shape, and at Donna's recommendation, took a paper punch and made a half a dozen small holes right at the bottom helmet line for air. They were nicely invisible, but probably life-saving. The visor got duct-taped in, as did a 2"-thick block of foam rubber on the inside of the top for my head to hold up.
Finally, I took a long sheet of black craft foam, cut some rectangles out of it, and cut those rectangles all the way through the back of the helmet for still more air holes. I applied some small squares of silver perf-paper Donna had to the inside of the black craft foam, and hot-glued it to the back of the helmet. The air holes were completely invisible, and I didn't kill myself when I had to wear it. All in all a win-win situation.
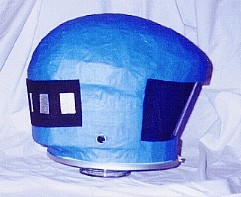
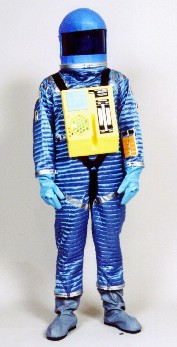
The helmet is, as you can see here, just the wrong shape. The original tapers in from top to bottom, has a bowed-out face plate and a ridge across the middle of the top, and has two mission insignias on the top. Actually, I originally thought those were more weird port connectors, so I didn't even think to make mission patches for it for Balticon. But after Balticon, and after some more pondering, I put the insignias on the helmet for WorldCon. They don't really show up in any of the photographs (for some reason we didn't do any side shots), but they were there, and they looked good.
The overall helmet was sufficiently suggestive of the originals that I was quite happy with it. I still am. If I ever have to do this again, though, I'm likely to start with the same egg, make a strong plaster-tape cast, and then get fiber-glass repair material, which is a synthetic fabric with an epoxy resin you pour over it. It's much smoother, much stronger, and a whole lot more dangerous to work with. But it'll work.
Next up we have the one huge prop - the monolith itself.